Building A NTP Server With Raspberry Pi and GPS
Posted August 6, 2023
By Kevin Schwickrath12 min read
- Overview
- Hardware
- Connecting GPS Module
- Connecting External Antenna
- Installing Raspbian
- Network
- Time Zone
- Updates
- Install Packages
- Prepare System
- Validate System Configuration
- gpsd Configurations
- Setup chrony
- Settings Explained
- Apply Settings
- Verify chrony Status
- Tuning chrony
- Conclusions
- Sources - Helpful Links - Geek Stuff
Overview
I’m introducing my youngest son to new things. Time keeping is always fun to geek out with because you can always get more precise. I thought this would be a quick and fun project to do together too. He pushed the buttons on this project with only some guidance from me.
🐘 𓃰
Let’s talk about our elephant in the room. The Pi is never going to be atomic clock accurate. This little computer doesn’t even ship with an RTC. It was never intended to act as a time source. You breathing on it can affect the time. When my status at the end of this guide very confidently says “Stratum 1!”, let’s take that with a grain of salt. I will say the Pi is likely better at telling time than ChatGPT is at giving me legal advice. Both are very confident, nonetheless.
Hardware
We used (roughly) the following hardware:
- Raspberry Pi 4B 8GB
- GPS with PPS output with the Adafruit Ultimate GPS
- GPS antenna
- SMA to SMT IPX/U.FL adapter if your antenna didn’t include one
- Breadboard wires
- CR2025 3V Lithium Battery
- SanDisk MicroSDXC Card
- SD Card Reader
I recommend researching product alternatives. I had all the needed hardware on hand from other projects. The products linked here aren’t necessarily the ones I used but should be compatible alternatives. For example Adafruit now makes a USB-C enabled Ultimate GPS
Connecting GPS Module
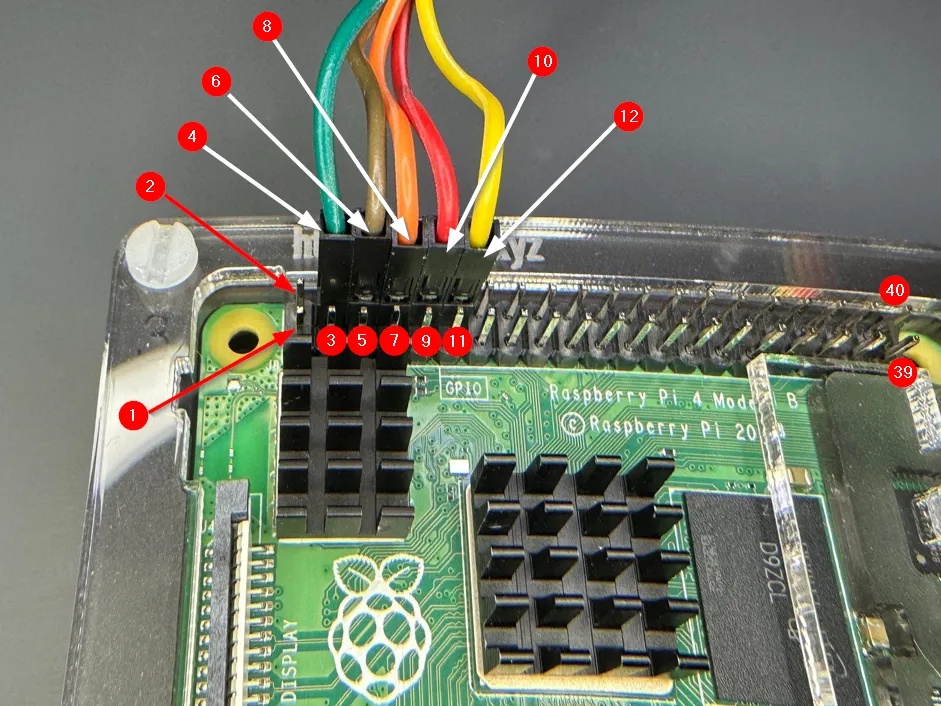
We need to connect 5 pins from the GPS module to the Pi. You can get more info here on the Raspberry Pi 40-pin Header, and more info on the Adafruit Ultimate GPS pins here.
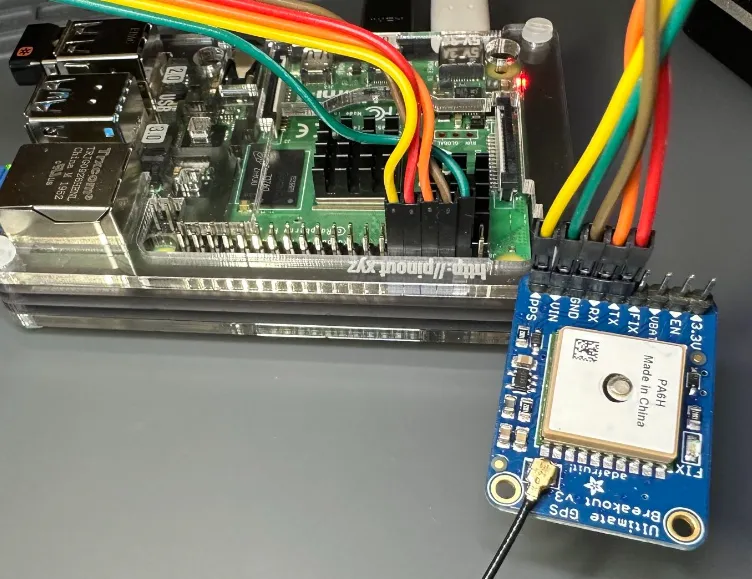
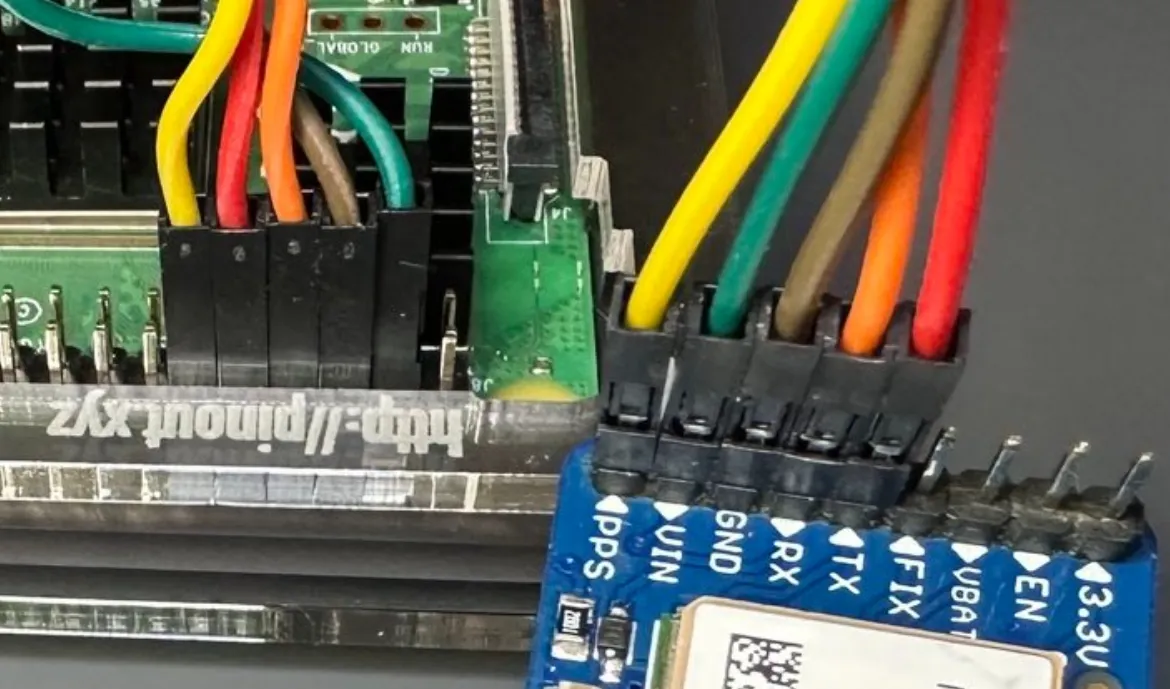
| Pi Pin | GPS Pin | Pictured Wire Color |
|---|---|---|
| 4 | VIN | Green |
| 6 | GND | Brown |
| 8 | RX | Orange |
| 10 | TX | Red |
| 12 | PPS | Yellow |
Connecting External Antenna
This is an optional component. Depending on where you live and where the GPS module is located you might not need an external antenna. I have one because my Pi sits in an old steel HP server rack. Basically a faraday cage.
On the GPS module you have an IPX/U.FL male connector. This connector is sometimes referred to as, Ultra Small Surface Mount Coaxial Connector, uFL, Hirose U.FL, Hirose W.FL, IPX, I-PEX MHF, MHF, IPEX, IPAX, AMC, UMCC, Amphenol AMMC, HF type, SMT Coaxial, AM, and that little thing that breaks all the time for antennas.
These connectors are fragile because they are only rated for about 10-20 connections max. They are also easy to misalign and break. If you’re interested you can buy a tool for attaching these. When looking for a tool be sure to get the correct type (ex. MHF4 vs. MHF3) for your connector.
When attaching the connector make sure you hear the satisfying click. Check out this video for a demonstration.
This video goes into great detail on how to work with these connectors.
The other end is a simple SMA connector. You screw these together like a garden hose.
Installing Raspbian
The easiest way to install Raspberry Pi OS is to use the Raspberry Pi Imager. I used Raspberry Pi OS Lite (64-bit) for this project. For brevity I won’t cover the installation of Raspberry Pi OS. You can find help installing the OS on the download page.
Network
I prefer wired networking for NTP servers, so I won’t cover Wi-Fi. I’m sure you can run your server over wireless if you’re determined. One thing you should do here is set a static IP. I accomplish this in my DHCP server. You can also do the same by modifying the Pi.
Edit the configuration file /etc/dhcpcd.conf.
sudo vi /etc/dhcpcd.confInsert your config lines:
interface eth0static ip_address=192.168.0.2/24static routers=192.168.0.1static domain_name_servers=192.168.0.1Reboot the Pi or restart networking to have the changes take effect.
service networking restartTime Zone
Again, I prefer UTC time. I think that comes from working multi-time zone networks for so long. I’ll show North America Central time in my example. To see what your Pi is currently configured for run the following:
timedatectlYour output should look like this:
Local time: Sun 2023-08-06 01:19:08 BST Universal time: Sun 2023-08-06 00:19:08 UTC RTC time: n/a Time zone: Europe/London (BST, +0100)System clock synchronized: yes NTP service: active RTC in local TZ: noTo change the time zone you will need to know your time zone name. List all the time zones with the following:
timedatectl list-timezonesOutput should look like this:
America/CaracasAmerica/CayenneAmerica/ChicagoAmerica/ChihuahuaAmerica/Ciudad_Juarez...You can set the time with the following command:
sudo timedatectl set-timezone America/ChicagoRunning timedatectl again will show you the updated time zone:
Local time: Sat 2023-08-06 15:20:08 CDT Universal time: Sat 2023-08-06 00:20:08 UTC RTC time: n/a Time zone: America/Chicago (CDT, -0500)System clock synchronized: yes NTP service: active RTC in local TZ: noUpdates
Update Raspberry Pi OS with following commands and reboot. Press “Y” when it asks otherwise you won’t install any updates.
sudo apt updatesudo apt upgrade
sudo reboot
Install Packages
We will install the following:
- pps-tools - Includes the headers for using LinuxPPS PPS (pulse per second) API kernel interface.
- gpsd - A service daemon for monitoring our GPS receiver through serial and making the data available via TCP port 2947.
- gpsd-clients - A client for interacting with gpsd.
- python3-gps - This package contains a Python 3 interface to connect to gpsd.
- chrony - An alternative NTP implementation of ntpd.
Use this command to install the above.
sudo apt install pps-tools gpsd gpsd-clients python3-gps chronyPrepare System
We need to edit /boot/config.txt
sudo bash -c "echo 'dtoverlay=pps-gpio,gpiopin=18' >> /boot/config.txt"sudo bash -c "echo 'enable_uart=1' >> /boot/config.txt"sudo bash -c "echo 'init_uart_baud=9600' >> /boot/config.txt"Edit /etc/modules
sudo bash -c "echo 'pps-gpio' >> /etc/modules"Enable the serial port.
sudo raspi-configSelect:
3 – Interface options
I6 – Serial Port
Would you like a login shell to be available over serial?
No
Would you like the serial port hardware to be enabled?
Yes
Finish
Reboot the Pi.
sudo rebootValidate System Configuration
Validate PPS is loaded with the following command:
lsmod | grep ppsYou should see an output like this:
pps_gpio 16384 0or like this:
pps_ldisc 16384 2pps_gpio 16384 2This command will show you PPS responses.
sudo ppstest /dev/pps0You should see results like this:
trying PPS source "/dev/pps0"found PPS source "/dev/pps0"ok, found 1 source(s), now start fetching data...source 0 - assert 1691335285.001247820, sequence: 126 - clear 0.000000000, sequence: 0source 0 - assert 1691335286.001242576, sequence: 127 - clear 0.000000000, sequence: 0source 0 - assert 1691335287.001238592, sequence: 128 - clear 0.000000000, sequence: 0gpsd Configurations
We want gpsd to auto-start, edit the gpsd config.
vi /etc/default/gpsdChange the values as follows:
START_DAEMON="true"DEVICES="/dev/ttyS0 /dev/pps0"GPSD_OPTIONS="-n"USBAUTO="true"Reboot the system to apply the changes.
sudo rebootLet’s look at the GPS data. Run the following command for a live view (hit ctrl+c to exit):
gpsmon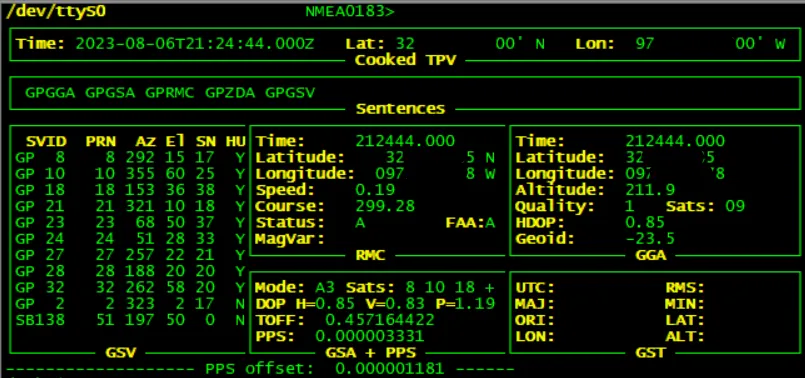
If you see the above, it works!
If you only see the garbage below, you likely don’t have your GPS module plugged in correctly.
tcp://localhost:2947 JSON slave driver>(82) {"class":"VERSION","release":"3.22","rev":"3.22","proto_major":3,"proto_minor":14}(262) {"class":"DEVICES","devices":[{"class":"DEVICE","path":"/dev/ttyS0","activated":"2023-08-06T15:25:27.449Z","native":0,"bps":9600,"parity":"N","stopbits":1,"cycle":1.00},{"class":"DEVICE","path":"/dev/pps0","driver":"PPS","activated":"2023-08-06T15:25:27.472Z"}]}(122) {"class":"WATCH","enable":true,"json":false,"nmea":false,"raw":2,"scaled":false,"timing":false,"split24":false,"pps":true}Setup chrony
Update the chrony config. Edit /etc/chrony/chrony.conf.
vi /etc/chrony/chrony.confI made some adjustments to the config for my personal preferences. I explain below some of these settings below the code block. Go to this page for a full explanation of all chrony settings.
###### My Changes ######
server time-a-b.nist.gov iburstserver time-a-g.nist.govserver time-c-wwv.nist.govserver utcnist3.colorado.eduserver 0.us.pool.ntp.orgserver time.cloudflare.comserver time.windows.comserver time.apple.com
local stratum 10
refclock SHM 0 offset 0.436 delay 0.2 refid NMEA noselectrefclock PPS /dev/pps0 lock NMEA refid GPS prefer
allow 192.168.0.0/16
###### Modified Default Options ######confdir /etc/chrony/conf.dkeyfile /etc/chrony/chrony.keysdriftfile /var/lib/chrony/chrony.driftntsdumpdir /var/lib/chrony#log tracking measurements statisticslogdir /var/log/chronymaxupdateskew 10.0rtcsyncmakestep 1 3leapsectz right/UTC
Settings Explained
server time-a-b.nist.gov iburstis telling chrony to use this server as a time source. You don’t need this many servers. I’m using them to gather data for another project. I’ll modify my config later withpool {FQDN} iburstwhen I’m finished playing.iburstwill quickly get a sync going, even if we’re not 100% accurate.local stratum 10command says in the event you lose contact with all time sources, continue to act authoritative and give out your best guess to clients.- Let’s look at our two refclock lines.
refclock SHM 0 offset 0.436 delay 0.2 refid NMEA noselectandrefclock PPS /dev/pps0 lock NMEA refid GPS prefer.refclockis a hardware source.refid {name}is an alias name.SHMandPPSdriver names or clock sources within the hardware.offsetused to compensate for a constant errors (in seconds).delaysets the NTP delay of the source (in seconds). Increasing the delay is useful to avoid having no majority in the source selection or to make chrony prefer other sources.lock {refid}used to lock a PPS refclock to another refclock. PPS samples are paired directly with raw samples from the specified refclock.noselectNever select this source, monitor only.preferPrefer this source over sources without prefer.
allow 192.168.0.0/16- This setting
#log tracking measurements statisticscombined withlogdir /var/log/chronywill turn on logging for debugging. Don’t leave this on as it will kill your SD card. maxupdateskew 100.0set the threshold for chrony to accept an calculated estimate. If our clock source error range is too large it probably indicates that the estimated gain or loss rate is not very reliable yet.rtcsyncsyncs the system clock with chrony’s time.- The next two items closely relate. This is really important only if you have applications that don’t accept big jumps well, NYSE financial transactions or timed sciencey stuff for example. For time keeping, Earth is an inaccurate wobbly flying ball of mud. To compensate leap seconds are inserted and deleted from UTC time to keep UTC time synchronized with the Earth’s rotation. Without this, it would eventually snow in our calendar’s summer or be dark at noon. When the system’s time needs to be adjusted, we have two options. To step the clock or smear (sliding) it. Steps are just like it sounds (think stairs); the system clock is stepped or jumped to the accurate time. Slewing adds an increasing amount of time to slowly bring the clock into alignment. Normally chrony will gradually correct any time offset. However, sometimes a jump is required, like at boot. Check out this for more on leap second smearing.
makestep 1 3The config says make the adjustment if it is larger than one second, but only in the first three clock updates.leapsectz right/UTCtells chronyd what timezone to use for leap seconds.
Apply Settings
Once you updated and saved your config restart chrony to apply the changes.
sudo systemctl restart chronyVerify chrony Status
chrony has lots of capability. We’ll use 3 basic commands to see what the server is doing.
chronyc -n sourcestats, chronyc -n sources, and chronyc tracking
Check this page out for explanations on everything in each command: Checking if chrony is Synchronized.
chronyc -n sourcestatsThis command shows us the statics of our candidate NTP servers. This is a capture directly after restarting the process. We don’t have any useful data yet. Remember, it can take 5 minutes or more for data to be calculated properly for the candidates. Be patient, wait 5-10 minutes between config changes for things to settle.
Name/IP Address NP NR Span Frequency Freq Skew Offset Std Dev==============================================================================NMEA 0 0 0 +0.000 2000.000 +0ns 4000msGPS 0 0 0 +0.000 2000.000 +0ns 4000ms132.163.96.1 1 0 0 +0.000 2000.000 +1585us 4000ms129.6.15.28 1 0 0 +0.000 2000.000 -1381us 4000ms132.163.97.3 1 0 0 +0.000 2000.000 -750us 4000ms128.138.140.211 1 0 0 +0.000 2000.000 -1720us 4000ms5.78.71.97 1 0 0 +0.000 2000.000 +1208us 4000ms162.159.200.1 1 0 0 +0.000 2000.000 -2466us 4000ms40.119.6.228 1 0 0 +0.000 2000.000 -2860us 4000ms17.253.126.253 1 0 0 +0.000 2000.000 -2831us 4000mschronyc -n sources -vThis command shows us information about the current sources. -v prints the help at the top. Key take away here:
- ”*” indicates a synchronized source. We’re getting time from here now.
- ”+” indicates acceptable sources.
- ”-” indicates acceptable but excluded sources.
- ”?” indicates sources with lost/bad connectivity. Everything starts with this until 3 or more samples have been received.
- “x” indicates source which chronyd thinks is a falseticker (bad, fake, broken, spoofed).
- ”~” indicates a source with too much variability.
.-- Source mode '^' = server, '=' = peer, '#' = local clock. / .- Source state '*' = current best, '+' = combined, '-' = not combined,| / 'x' = may be in error, '~' = too variable, '?' = unusable.|| .- xxxx [ yyyy ] +/- zzzz|| Reachability register (octal) -. | xxxx = adjusted offset,|| Log2(Polling interval) --. | | yyyy = measured offset,|| \ | | zzzz = estimated error.|| | | \MS Name/IP address Stratum Poll Reach LastRx Last sample===============================================================================#? NMEA 0 4 377 14 +44ms[ +44ms] +/- 108ms#* GPS 0 4 377 14 +936ns[+1316ns] +/- 177ns^- 132.163.96.1 1 10 377 967 +1556us[+1573us] +/- 18ms^- 129.6.15.28 1 10 377 241 -1953us[-1952us] +/- 23ms^- 132.163.97.3 1 10 377 121 -1576us[-1576us] +/- 22ms^- 128.138.140.211 1 10 377 24m -1938us[-1923us] +/- 21ms^- 5.78.71.97 2 10 377 409 +1838us[+1835us] +/- 37ms^- 162.159.200.1 3 10 377 458 -5633us[-5637us] +/- 19ms^- 40.119.6.228 3 10 377 396 -6626us[-6629us] +/- 37ms^- 17.253.126.253 1 10 377 447 -4726us[-4729us] +/- 7672uschronyc -n trackingThis command shows us information about the currently locked source.
Reference ID : 47505300 (GPS)Stratum : 1Ref time (UTC) : Sat Aug 06 00:55:22 2023System time : 0.000000141 seconds fast of NTP timeLast offset : +0.000000302 secondsRMS offset : 0.000000300 secondsFrequency : 11.530 ppm fastResidual freq : +0.000 ppmSkew : 0.004 ppmRoot delay : 0.000000001 secondsRoot dispersion : 0.000016511 secondsUpdate interval : 16.0 secondsLeap status : NormalTuning chrony
This isn’t terribly complicated, but I didn’t find anyone who really connected the dots for someone who reads every 3rd word in a sentence (if I’m concentrating).
See the +717 below? 717 is bad. This number needs to be as close to 0 as we can get it. Our GPS line (PPS) depends on the NMEA offset to be within a certain amount.
Why? PPS knows the start and end of a second. NMEA knows which second and passes this to PPS. If they are too far apart they can’t lock.
chronyc -n sourcestatsName/IP Address NP NR Span Frequency Freq Skew Offset Std Dev==============================================================================NMEA 21 12 316 +59.729 66.137 +717ms 7044usGPS 0 0 0 +0.000 2000.000 +0ns 4000ms132.163.96.1 9 7 330 -1.763 12.824 +1242us 733us~~~~How do we fix this? Simple, remember the refclock lines in our config? We need to adjust the offset. I ended up with 0.436 as my offset.
refclock SHM 0 offset 0.436 delay 0.2 refid NMEA noselect
To generate this wild +717 I set my config as follows:
refclock SHM 0 offset -0.236 delay 0.2 refid NMEA noselect
A negative offset adds to your total. A positive number subtracts. For example, if you have +500ms offset and change your config to 0.100, your offset should show around +400ms. Take the same +500ms and you set your config to -0.100 your offset should increase to +600ms.
Keep in mind, your offset will fluctuate as satellites fly in and out of view, temps change, loads on CPU fluctuate, etc. Getting the number to within +/- 100ms is usually good enough to get a lock to happen.
After about an hour of running I had this:
Name/IP Address NP NR Span Frequency Freq Skew Offset Std Dev==============================================================================NEMA 39 21 609 -2.620 26.729 +21ms 8699usGPS 8 6 113 +0.000 0.031 +1ns 476ns132.163.96.1 29 14 141m -0.041 0.072 +3483us 204usThe next day it looked like this:
Name/IP Address NP NR Span Frequency Freq Skew Offset Std Dev==============================================================================NEMA 19 9 286 -17.101 100.307 +64ms 8164usGPS 6 3 78 -0.023 0.061 -226ns 509ns132.163.96.1 13 10 276m +0.111 0.036 +2194us 163usLet’s look at that time now with the date command.
date +"%a %F %T.%N %Z %z"Sat 2023-08-06 15:56:38.772947939 CDT -0500Conclusions
That should about cover it. The next step is to start updating your clients. For devices like IP phones and some network gear you can set option 42 in your DHCP server. Option 42 specifies servers that provide NTP/SNTP services (RFC 1769) on the network.
You can likely get similar results to this project with NTP and a RTC module. Here is a tutorial that looks like it covers all the points.
You can always roll your own RTC.
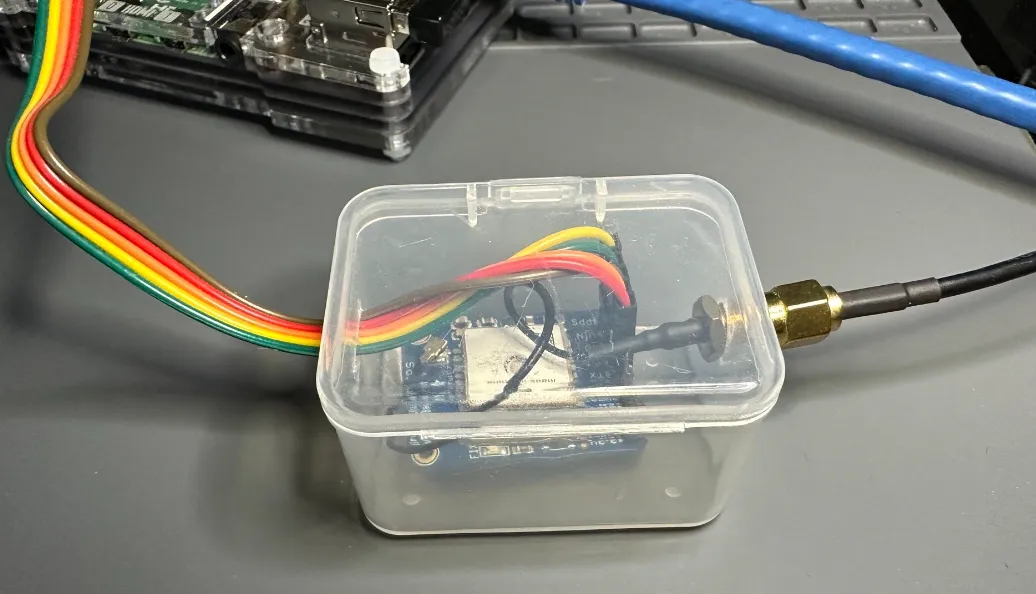
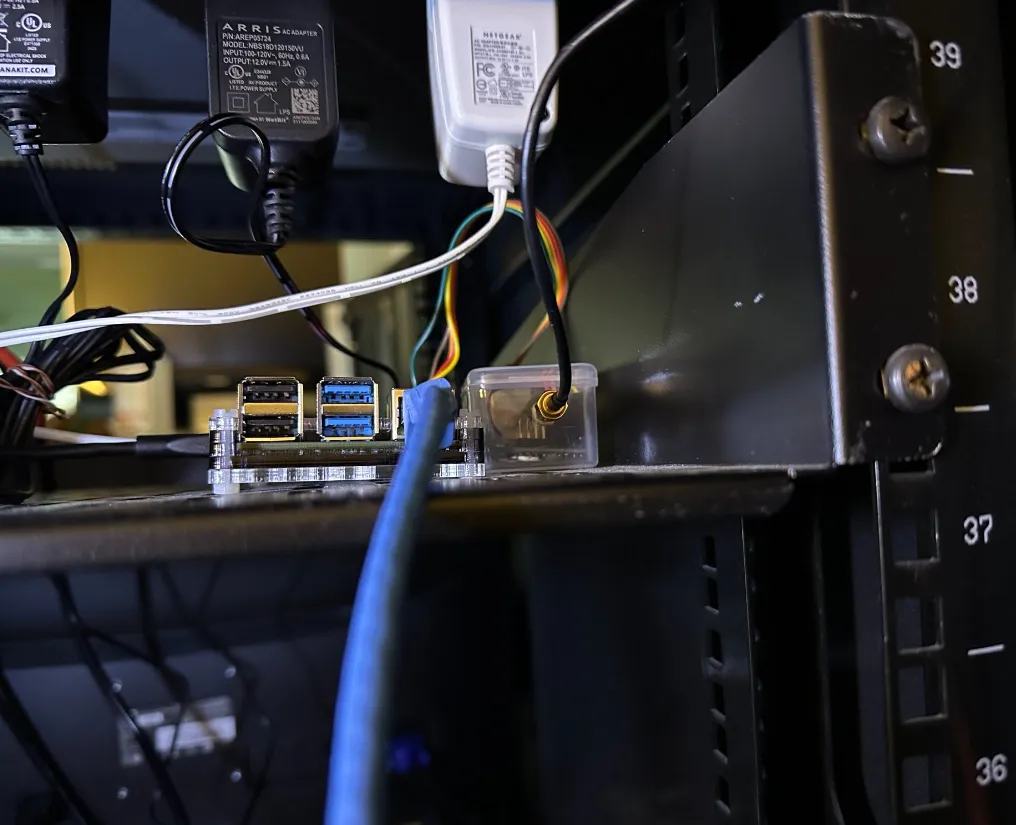
I put the GPS module in a little parts box I had.
chronyc -n sourcesMS Name/IP address         Stratum Poll Reach LastRx Last sample===============================================================================#? NMEA                          0   4   377    13    +73ms[  +73ms] +/-  105ms#* GPS                           0   4   377    13   -429ns[ -457ns] +/-  493ns^- 132.163.96.1                  1   6   377    30   +406us[ +405us] +/-   19ms^- 129.6.15.28                   1   6   377    35  -1908us[-1908us] +/-   24ms^- 132.163.97.3                  1   6   377    35   +384us[ +383us] +/-   21ms^- 128.138.140.211               1   6   377    34  -1171us[-1171us] +/-   21ms^- 108.61.56.35                  2   6   377    33  -2877us[-2877us] +/-   55ms^- 162.159.200.1                 3   6   377    35  -2618us[-2618us] +/-   16ms^- 40.119.6.228                  3   6   377    33  -4100us[-4100us] +/-   43ms^- 17.253.126.125                1   6   377   161  -2783us[-2783us] +/- 5846us
chronyc -n trackingReference ID    : 47505300 (GPS)Stratum         : 1Ref time (UTC)  : Sun Aug 07 21:30:33 2023System time     : 0.000000002 seconds fast of NTP timeLast offset     : -0.000000095 secondsRMS offset      : 0.000098806 secondsFrequency       : 11.318 ppm fastResidual freq   : -0.000 ppmSkew            : 0.010 ppmRoot delay      : 0.000000001 secondsRoot dispersion : 0.000021171 secondsUpdate interval : 16.0 secondsLeap status     : Normal
Sources - Helpful Links - Geek Stuff
- I ran across this post a year ago or more on Reddit (RIP Apollo App). It was the inspiration for me to put this together.
- This page has some good info on the differences between ntpd and chrony.
- As does this page.
- I enjoyed this discussion on setting up chrony with PPS. Thanks for keeping a 7 year old post up!
- I skimmed the chrony.conf help page a few dozen times. I still don’t use half the functions chrony is capable of.
- Helpful explanation of how PPS and NMEA work together.
- Some thoughts on running GPS only timing.
- Good read if you have trouble.
- What Exactly Is GPS NMEA Data?
- Why do GPS receivers have a 1 PPS output?
- Leap Second Smearing with NTP
- Info on the Adafruit Ultimate GPS
- Troubleshooting GPSD
This post is licensed under CC BY 4.0 by the author.
Related Posts
Building A DNS Server With Raspberry Pi
Building on last week's project I'm going to add a DNS server to my Project Pi. This is replacing an existing Pi 3B already running the service.